Showing posts with label guest posts. Show all posts

CAMP.

its that time again(:

TIME FOR SUMMER CAMP!

I will be gone for A WHOLE WEEK.

just kidding.

ill be gone from monday to sometime on friday.

but thats almost a week, right?

sooooo.

DURING THAT TIME..

please know that i didnt die. i am just at summer camp.

and i will come back with lots of pictures and lots of things to write about and tons of other goodies.

just wait for me to come back, and all this is yours(:

BUT WAIT....

theres more!

if you would like to guest post super short notice for me, that would be SO AMAZING.

please please please let me know asap if you would like to guest post and i will let you know a time when i am free (that shouldnt be hard, unless you ask like tomorrow...because im leaving at 8).

so ASK AWAY!!!(:

have fun guys!

xo, hannah mae.

Read more...

cupcakes // a guest post by lindsey

Hello! Today I have a special treat...literally! Lindsey from Sprinkles of My Life is here guest posting! Enjoy!! :)


Cupcakes. <3 I love them. They are a warm, sweet treat on a chilly, winter day...a melt-in-your-mouth treat on a sunshiney, hot day in the summer...and a savory delicacy on ANY day! :D They are all around delicious. They are good models for photographers. And they are quite cute, if I do say so myself. My sisters and I have cupcake parties all the time! I make the batter, bake them, and photograph them. Thirteen year old Sarah spreads frosting on them and decorates them. Seven year old Landri helps with whatever we need her to do! Wanna see some of my cupcake photography?! ;D


I love how the chocolate icing comes to a little point at the top!

Interesting lighting... :)

Yellow cupcakes with chocolate frosting

idk why this looks all shriveled! :P

black and white :D wish it wasn't so blurry! :P

All in line...waiting to be frosted(;

lovely white<3

lots of dots! :D

Background sprinkles :D

love! <3

Cupcake pile!


Hey! I'm Lindsey from Sprinkles of My Life! I have been emailing Hannah for a little while, and we thought it would be cool to do a guestpost swap thing, so that’s what we’re doing! J A little about me? Most importantly, I'm a daughter of the King, but I'm also a...cupcake lover, passionate photographer, Disney princess fan, letter writer, and performer, who enjoys singing, blogging, sharpies, making friends, fashion, and eating skittles!<3 I'm also a 15 year old homeschooler, and the oldest of 4, with a small business making friendship bracelets & anklets {Friendship Twists: Bracelets & Anklets}. Check it out!!! :) Thanks for this opportunity, Hannah!<3 Your blog is amazing. :D

Love ya!

~Lindsey~


Hope you liked the post! Have a great day!


xoxo,
Hannah Mae

Read more...

curly hair // a tutorial

   I made a little tutorial on how to do curly/wavy hair with a straightener! I do this to my hair all the time! Its super fast and super cute! :)


Start with your hair natural. If it was straightened, that's fine, but it's really bad for your hair, so I suggest leaving it natural first.

Using a big hair clip, pin up the top section of your hair, only leaving what is below your ears. Really small sections are the best for this.


Grab about a 1 inch section of hair, and clasp your straightener down at the top. Twist it toward the outside so that it looks like the picture. Pull down, as if you're straightening your hair, but there is a twist in it, so it should curl it instead.

One curl done! :)

Repeat that with that side of your hair. 

Now do the same with the other side of your head. Clasp, twist, and pull!

Now repeat again until the whole side's done.

Okay, now that you've done the bottom layer, spray a tiny bit of hair spray on it (optional...i don't use hair spray) and then brush it out. The result should be wavy-ish hair.

Now let down a bit more hair, and pin up the rest again. Curl the pieces that aren't curled yet, then spray them (optional) then brush it out again.

Now that the second section is done, pin up the rest of the hair and then curl that section in the same way.

The third section is all curly now!


Do the last section in the same way. Almost done!

All you have to do now is decide weather to leave your bangs down or up. Here is with my bangs pinned back..

And here is with them down!

Have fun with this hair style! :)

xo,
Hannah Mae

Read more...

a guest post by lizzy.

Hello! Sorry I've been MIA for a while... but I'm back now! I have a really fun guest post today.. This young girl is so awesome! Her name is Lizzy and she is what I like to call a mini fashion blogger! :) She has a really cute blog and a really good message to tell the world! Don't just let me talk forever, here it from Lizzy herself!

Hey everyone!
My name is Lizzy. My friend Sammi and I have a the fashion blog, Pretty Modest. We are Christian girls who believe in dressing modestly. Our blog is mostly for pre-teens and teenagers who love style but find it hard to dress in a way to honer God. I use to not really care about get me wrong, I didn't dress trashy. I just didn't really care if I looked nice. But I realized that we can be an example by dressing modestly. We imply to others that we act how we look. So, why not take the challenge? Can you dress modestly and show other what you believe?


I wore this outfit just around the house and to a friends house. The skirt is super comfortable! :) When I went to my friends house, I changed in to sneakers and a hoodie. I love this shirt. I bought it at value village for just 3 bucks! Did I mention it was an aeropostale shirt? :-)

I just want to thank Hannah for having me guest post for her! Her blog is awesome.
Hope you all have an fantastic day!

Keep Shining, Lizzy <3

I hope you all liked the guest post! I loved it! :) Have an amazing day!

xoxo,
Hannah Mae

Read more...

Guest Post by Jemima: Being an Artist

Today I have a special treat for you guys.. a guest post by Jemima from Jolie!
Enjoy, and make sure to check out this beautiful girl's blog! 


Hi my name is Jemima and I am the writer and creator of Jolie. Jolie is my blog where I can pour out my heart no matter the circumstances. I am the 4th child out of 5 children. I was adopted when I was 3. My passion is to become the next big fashion designer. But right now I am actually pursuing becoming a more Godly girl and just getting through the "not so best years".....High school.  I am a very crafty person. I adore using my hands to create wonderful masterpieces. I use my hands to create beautiful hair accessories. You can visit my shop by clicking here!  Well enough about me....lets talk about a topic that has been in my mind for awhile.

When I think of an artist I think of a person who paints an awesome painting. When I moved to CA (originally from AZ) God showed me the true meaning of an artist. 
An artist is a person who creatively creates true master pieces. 


I never called myself an artist because in my head I thought an artist was a painter. But now I know  the true meaning of an artist. Either photography, street art, a piece of writing, a movie, or even a simple little craft. I say that what ever you create, you are an artist....even if it wasn't created with paint. I can actually call my self an artist. Or at least in artist in the making! 

No matter what you do in life, you are always an artist.

Well I hope you liked me guest posting today! I hope you will visit my blog and maybe become a daily reader of it! Please click here to visit Jolie.

xoxo
-Jemima

Did you like her post? I sure did! Again, make sure you check out her blog! It's great!! :)


xoxo,
                Hannah Mae

Read more...

spring // a guest post by ryan

Pinned Image
>>source<<
Spring
is one of my favorite seasons.

When I wake up,
I look toward my window to see the bright sun bekoning me,
and I run my fingers across the windowsill,
seeming to pick up the light.

I braid my hair,
feeling the almond strands,
and peering out of my window,
feeling comfort.

I open up the door and cautiously step out,
feeling the still-cold ground as it recovers from winter.

Slowly,
 I walk a long pathway that holds blooming flowers of all sorts,
my feet beginning to bounce on the soft green grass around me.

This is Spring.

The clouds above me are waving past,
the sun is placed on a bright pedestal for all of the world to see.

The trees above me hold small white jewels,
and I watch them bloom in slow motion.

Into my nose comes the scent of the crisp breeze,
and the dewdrops that form on the untouched grass.

This is a new beginning.
This is Spring.

love, ryan

Read more...

I did my first guest post!! :)

Hey guys! I did my first guest post (on somebody else's blog) yesterday! Here is the link if you wan't to check out Kiana's Blog....(and my guest post...)


http://kianabates.blogspot.com/2012/03/guest-post-hannah-from-let-it-rain-love.html 


Have a wonderful day! :)


xoxo,
   Hannah Mae

Read more...

Guest Post by Kiana Bates: Brownie Time!

I have an amazing guest post for you today! Her name is Kiana Bates, and she is from the blog Kiana Baking Bates. She is an awesome blogger and this is one awesome post! So, without further ado......... here's her post! 

Hello there Let It Rain Love readers!
I'm Kiana, coming over from Kiana Baking Bates, where I blog about the delicious sweets that I make in my free time. I love making cookies, brownies, and cupcakes. They are so fun, and there are so many different recipes that you can try!

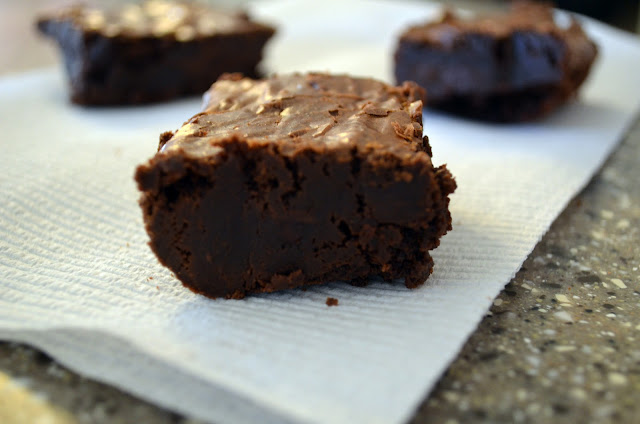
Here is my latest creation:
Brownies!

I love brownies. I could probably eat them all day. But that would not be good.
I am so used to making them out of a box, since that's what I've been doing for my whole childhood.
It is so nice to get a homemade one that tastes way better than the out of the box brownies the I am so used to.


The Best Brownies

props to: Bean Town Baker

Ingredients 
  • 1 cup (2 sticks) unsalted butter
  • 2 1/4 cups sugar
  • 1 1/4 cups cocoa
  • 1 tsp salt
  • 1 tsp baking powder
  • 1 tsp espresso powder, optional
  • 1 Tbsp vanilla
  • 4 eggs
  • 1 1/2 cups flour
  • 2 cups chocolate chips
Instructions
1. Preheat the oven to 350°F. Lightly grease a 9" x 13" pan
2. In a saucepan set over low heat, melt the butter, then add the sugar and stir to combine. Return the mixture to the heat briefly, just until it's hot, but not bubbling; it'll become shiny looking as you stir it. Heating this mixture a second time will dissolve more of the sugar, which will yield a shiny top crust on your brownies.
3. Transfer the sugar mixture to a medium-sized mixing bowl, if you've heated it in a saucepan. Stir in the cocoa, salt, baking powder, espresso powder, and vanilla.
4. Whisk in the eggs, stirring until smooth.
5. Add the flour and chips, again stirring until smooth.
6. Spoon the batter into a lightly greased 9" x 13" pan.
7. Bake the brownies for about 30-35 minutes, until a cake tester inserted into the center comes out clean, or with just a few moist crumbs clinging to it. The brownies should feel set on the edges, and the center should look very moist, but not uncooked. Remove them from the oven and cool completely prior to cutting.

8. Enjoy with all your heart.

^ That is a very important step in the process! If you're going to take the time to make homemade brownies, then why not enjoy them!

What do you think? Do you like Kiana's post? Well then visit her blog and leave a comment or something nice, and, even better, follow her! :) she is a super cute girl who is amazing at blogging! Go check it out! You won't be disappointed!


xoxo,
   Hannah Mae

Read more...

Nail Art-- Guest Post by Selina!!

Today I have an awesome guest post for you guys today! 
It is a nail art design from a wonderful girl named Selina. I hope you enjoy! Also... make sure you watch the video below! :)


The nail art design I'm about to show is the galaxy. This is the first time I have ever done this design before. I hope you will enjoy it!

Supplies you will need.

  • Tweezers
  • Toothpicks
  • white, yellow, dark blue, black, and pink nail polish. 
  • nail polish remover 
  • makeup sponge 
  • paper plate
Preparation steps:
You will need to turn your tooth pick into a dotting tool.

Here is how:
Dip your toothpick into the white nail polish and rotate till its dry keep doing this till you have a hard dot at the end of your toothpick.

Next, you need to rip your makeup sponge into small tiny pieces. Smaller than your pinky finger. You should have at least 5 of those ripped.

This is an important step. Before you start to dab any colors to your nails make sure you pour a lil bit of the nail polish on a paper plate. That way all you have to do is dab the sponge in the color then onto your nails.  Please remember that you are in a way blending the colors so you have to work quickly. It should take you about 10min max to paint your nails.

Step 1: Paint a base coat on your nails, and then add 1 or 2 coats of black nail polish afterwards. Let it dry.

Step 2:   After the black is dried, you will grab one of your small pieces of sponge, and dab it into the white from the paper plate, then dab a diagonal line on each of your fingers.
 

Step 3: You will repeat step 2 with the color yellow next, but the yellow will go over the white. As you add more colors to the nail make sure you dab it lightly each time.


Step 4: Repeat step 3 only with the color pink, only this time keep the pink close to the yellow. So it doesn't have to be right over but around the yellow.


Step 5: Repeat the same step with blue, only you add the dark blue to the edge of the galaxy colors.


Step 6: Using your dotting tool (the toothpick), dip it into the white nail polish bottle, and add little white dots all over the nail designs. These are the stars. 

Step 7: To make sure your nail art is safe for at least 10 days, add a protective clear top coat to the design.

If you were to do this on your toes, I only did the galaxy on my big toes. For the rest, I added a silver glitter nail polish to make it look like stars.


I hope you enjoyed this tutorial. If you have any questions, please feel free to email me at spike95dancer@gmail.com

OR...

leave a comment on my blog.
Here is the link. http://selina-capturingeverydaybeauty.blogspot.com/


To know more about me, check out my about me page on my blog.
I hope you have a wonderful day!
Much Love,
~Selina~

The post was so good!! I loved it! What did you think?! Leave a comment or visit her blog! Have a great night:)

xoxo,
               Hannah Mae

Read more...